In my head, I live in this dichotomous world...

I'm rather "frugal" when it comes to all things money and I'm also a DIYer to the nth degree...Which is one of the reasons I got into photography in the first place.  If I think I can "do it myself" then, by golly, I'm going to do it...

(and if you could see my basement with my plethera of junk piles...you'd understand my passion for "making do" and "upcycling" things...)

HOWEVER, I'm also a professional photographer who charges money for services, and although my pricing doesn't necessarily reflect my expertise just yet...they aren't garage sale prices either...

That said, I truly believe that investing in a professional photographer for family pictures and senior pictures is IDEAL for the sake of your own sanity (and that of your offspring), as well as the quality of imagery & processing that takes place.

And yet, I know that for some, Senior Photography just isn't in the budget...it can be (and according to the work involved for a photographer, it should be) expensive!  So for that reason, I'm going to share just a little bit of what I know about Senior Photography! Pinterest does a great job of putting lots of images out there, but you've all seen the "pinterest fails"...so, although they are a great starting point for creativity, don't let it be your end all...YOU are the only YOU...and YOU have the eyes that are in YOUR head...and therefore, YOU have something to offer that noone else can see...

I know this to be true because my best friend is a photographer as well...we've done LOTS of weddings together in the past and it amazed me EVERYTIME how we could be in the exact same place, seeing the same thing, but we each would "record" it differently!

That said, there are a couple of things to keep in mind when setting up for a Senior...

Obviously there are the first two tips that go along with any senior photo session:

1) Fun Outfits!  This is PLURAL for a reason.  Senior photography is vastly different than family photography...there aren't "relationships" to be captured...but rather, individual personality...and multiple aspects of that personality!  Therefore, I advise my seniors to have at least 2, if not 3 outfit changes that represent WHO they are, when they feel most pretty/handsome, when they feel most comfortable...

2) GREAT Locations with good LIGHT! Again, we have PLURAL...this takes TIME and behind the scenes work constantly...different times of day, watching how the light hits different locations, etc...I look for different options like nature, urban, classic, academic...have a pocketful of places that exemplify YOUR senior!

These other tips have to do with Posing!

I'm going to stick with girls for this post, as Katelyn James has already posted this sweet guys posing guide on Pinterest and I have it pinned to My Board for you to peruse!

In reality there are COUNTLESS posing strategies for girls...however, for the sake of my own time management, as my list of fall edits is now over 25...WOW! I'm going to hone in on just a few..each one can be used in different locations/settings...but ultimately, it's noticing a few key things in each situation:
* how the light hits her face
* what is tack sharp in the image (i.e. THE EYES)
* how flattering the pose works for the individual

3) Posing

Here are my top 3 "go to" poses when it comes to Senior Girls:

* Power Stance:
   What it IS: Standing with 1 or both hands on hips, or hands in pockets, or hands behind back! It                             reflects their confidence, their "fun factor"...I'm trying to glean their personality from                           this pose!
   What it is NOT: gritting teeth, standing with hands down at sides, hunch back, slouching, etc


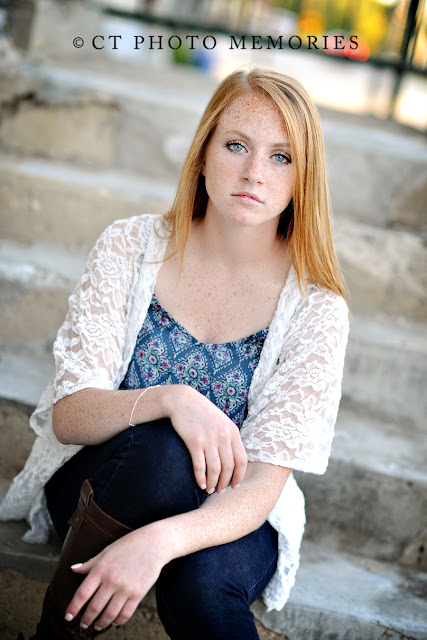
* Sitting on steps:
   What it IS: Letting knees fall together to create angles instead of just a box, so to speak. Using                                arms & hands to create emotion...hands down is more playful and fun...hands by face                          evokes emotion & intimacy/personable
   What it is NOT: seductive, grungy, keeping legs straight up & down without a different camera                                     angle, etc.


* Close Ups:
   What it IS: This one is truly important with regards to focus and I MUST nail it...eyes MUST be                            tack sharp in close ups.  This is the essence of a person...therefore, my aperture is wide                        open. I often use principle of thirds on this, and these are often the ones that I will                                duplicate in black and white.
    What it is NOT: random crop of a regular posed picture, soft or blurry pic, shadowed or darkened                                  image.


Final Tips:  Watch for stray pieces of hair & clothing malfunctions...Be sure hands on face aren't a distraction or smooshing skin...don't forget CANDIDS: these are the moments that they aren't looking at the camera, but rather just talking or laughing...these are often my MOST favorite captures! Candids often happen unposed, waiting for things, or just the unexpected...


These are just a few of my tips from Senior Photography...I hope they help you develop your own style and "viewing through the lens"...I practice lots on my own daughters for fun..it's not JUST for Seniors...but, it's hopefully a good starting place when photographing individuals rather than groups/families!

Have a great week!


This could probably be catagorized into my "personal" labeled blog posts, but with the drama of last week, I thought perhaps this might be helpful to even just one person...

I know that when I heard it on the radio, it brought back lots of memories & images in my mind...and it was a good reminder...and reminders are always good for Teach It Tuesday!

A long while ago I read the book Purpose Driven Life by Rick Warren  We read it as a small group when we were first married. At that time in my life though, I was a new wife, with the twinkle in my eye of having our first child...building a home, being a teacher...it just confirmed my purpose...

Fast forward 16 years...we've been through multiple seasons of life...some physically draining, others emotionally extracting...super highs and exhausting lows...

I just wanted to recap on a message that I heard and then add a little something extra from my own thoughts...Pastor Warren has written a new book, SHAPE: Finding and Fulling your Purpose, and I heard it summed up on the radio this week and thought I'd share...

He uses SHAPE as an acrostic to explain how the make up of WHO you are contributes to how you are SHAPED for your PURPOSE!

S-spiritual gifts
H-heart or passion
A-abilities and talents
P-personality
E-experiences (life, educational, etc)

I added the extra S for season of life


There are times, especially in the midst of the crazy that I question what exactly am I supposed to be doing?  It isn't that being wife to my husband or mother to my children isn't enough...it's not that...and believe me, I have enough laundry, dirty dishes and weeds to pull to last a couple lifetimes, so I'm not hurting for "THINGS" to do...

But, I know that I was created with purpose...
(I'm going backwards in my acrostic)

There were some seasons of life that my SOLE purpose was to dedicate myself to the care of my little ones and to my husband...

However, as seasons have changed, I've been prompted to recognize that the "need" for me is different than before and it therefore frees up other areas that "SHAPE" who I am to be highlighted in different ways...

My life experiences have allowed me to connect with people that I wouldn't otherwise have similarities with...
My personality (my craving for human interaction) puts me in positions to be able to encourage others and hopefully bring some "happy" to a moment in time...
It's not arrogant to understand that we all have different abilities...organization is NOT one of mine, nor are navigational skills or driving a tractor...but, I "see" things through a lens differently than others and I keep working to hone that talent daily
Our desires are in there for a reason too...I do not believe God gives us a heart for something without a purpose for it being there...whether it be to develop patience because we aren't meant to develop it,  OR because He wants us to chase it...

I have many Moms and Dads that have attended Snapshops and Mentoring...there is a "heart" for photography in them...and depending on your season of life, you may not have the time needed to develop & chase after it in the present...

I would encourage my friends though, to take a look at your SHAPE and make a step towards whatever you believe your purpose to be in this moment in time...

I NEVER imagined I'd have a small platform to "teach"...that I'd own my own business...that I'd be able to contribute to my family financially but do it on my own time table...that I could invest in the lives of so many people only to have them give back 10fold to my own heart with encouraging words and thoughtful actions...

Life is not perfect...(just take a look at my last week) It's encouraging to know that YOU are the ONLY YOU out there...and all the different components that make you WHO you are, are unique and created for a purpose! 


I've had a few FULL family sessions here lately...

When I used to shoot weddings, I had lots of large group images to shoot as well...

Photography can already be daunting when you are really wanting beautiful story-telling images...but, throw roughly 15 different individuals into the mix and things get a little crazy...

and not just with the photography part...

there's posing and keeping kiddos happy and lots of checks and rechecks...

Here are a list of things that I tend to run through the checklist in my mind as I'm photographing large groups...

1. Try to keep everyone on the same plane:  This means, you almost want to pretend that everyone is a mime and they are trying to get out of the "box" so to speak (are you picturing everyone with white gloves and painted faces putting their hands on the imaginary glass?) The more you are able to keep everyone's faces somewhat on that "plane" the better chance you have at being able to still get some beautiful bokeh AND getting sharp images.

(f 1.6   1/3200  ISO 500)

2. Keep in mind your depth of field as it pertains to your aperture.  There are two schools of thought here...1) you CAN have a low aperture...even as wide as 1.6 with lots of people (see my example above) However, IF that is the case, it is IMPERATIVE that you not only keep them on the same plane but, you also have to keep in mind just how far away you (and your camera) are from the subjects.  The further away you are, the wider IN focus area you will have.
2) bump your aperture up to at least f4.  If you remember in our Snapshop class we talked about aperture and I gave you the example of the telescope?  The higher the number, the more in focus...but, you will also lose bokeh if you go too high.

(f 2.5   1/640   ISO 400)

3. Have everyone touching in some way. This goes more in line with my philosophy of photography than anything else, but the last thing you want with large group photos is for it look like a mugshot line up.  Typically, with large groups, in my line of "work" they are FAMILY...so remind them to get close...even into each other's personal space...it's only for a little bit of time, but very worth it in the end.
(f 3.5   1/640  ISO 400)

4. Line up feet.  This pertains more to groups that are only in one line, but people tend to want to form a "U" shape instead of staying on that "same plane" as I mentioned before.  Sometimes I just have them scooooot back on the ends to form a straighter line.

5. Keep your shutterspeed FAST!  This is critical!  Especially if your aperture is lower...It also sometimes means that you have to bump up your ISO to compensate and allow for that increased speed.  You still need a good amount of light!

6. Check your LCD screen.  Yes, this takes time and you have to make people wait a second before moving...but, the alternative is to realize AFTER everyone has moved out of position that you have blinks or someone's head is hidden or there is a blur somewhere...I typically will sing them a song or tell a joke or do something to keep their attention IN THEIR SPOT while I do a quick check!  

Friends, I hope this helps you when you are planning your get togethers this fall and winter!  I know large family pictures can be challenging, but if you keep these tips in mind, I know that they'll help you in getting those images that you envision!!!

(if you are still having trouble, I would definitely look into getting your lens and/or camera cleaned & calibrated just in case there is a mechnical issue...especially if you've tried all these suggestions listed above)

HAPPY FALL Y'ALL!!!
"Moooooooooommmmmmmmmmm, it's too BRIGHT!!!"

My daughters all have sensitive eyes...

I mean, their eyes literally start to water the minute they hit the outdoors on a sunshiney day...We've invested in sunglasses and hats to help...but, I'm sad to say, they are just going to end up with eye wrinkles when they get older because in full sun, their eyes resemble slits on their faces instead of actual eyeballs...

Some of you know what I'm talking about...you've tried to get pictures at the park, or at the fair, or even on the beach in the summer and everyone is squinting or there are hot spots or racoon eyes...

What can you do?  Do you just skip out on midday picture taking fun?  Do you just resolve in your mind that you aren't going to get any "good" pictures of your kids during the hours of 10am to 5pm any particular day unless you are indoors?

Ummmm...Heck to the NO!!!

Here are some tips that I believe will help you as you determine to capture the lives of your kids, in any situation...whether it be swimming in the sunshine, playing at the park, playing an outdoor sport...

It takes a little preparation on your part and of course some practice, but these "micro" adjustments can have "macro" results on your final images!

Here we go:

1. SPOT METER:  This means to set your metering to SPOT.  Canon & Nikon have different metering options...you can read THIS post for more information about that. Spot metering forces your camera to just measure the light that you need to expose for your subjects FACE only...it won't take into account, the bright sun/blinding light...it only reads on your subjects face.  This may cause you to adjust your settings such that it blows out that background, but at least you won't end up with silhouette pictures and you'll be able to SEE the smiles from the moment!

2. RE-POSITION: Sometimes this refers to YOU and sometimes it refers to the SUBJECT.  If you are taking pictures specifically, you can reposition your subjects...for example, if there isn't necessarily a "moment" happening, but rather you are documenting the "characters" of your story, you can move them (continue reading the other tips) OR you can move yourself...You may have to shoot right into the sun, and maybe even use your lens hood or hand to block the sun into your lens (sort of like the visor in your car).  You want to have your subject turn AWAY from the sun.  This helps to avoid the half & half shadows on faces or even the racoon eyes that the harsh light can cause.


3. TRY TO FIND SHADE/FILTER/BLOCK LIGHT SOURCE:  If you are in an area where there is shade, go to the edge of it.  You don't want to go into a cave or so far into shade that you lose the authentic color and lightness of the environment...Use trees or structures to filter the light OR to actually BLOCK the harshness of the light...You still are able to get the beautiful rays, but without the harsh spot causing hazy halos or the inability of the camera to focus on anything.


4. LOOK FOR NATURAL REFLECTORS: You probably have recognized that indoors, it's easier to take a picture in a room painted a light khaki or pale yellow or even white as opposed to a dark red or brown room.  It's because walls become natural reflectors of light...it's the same outdoors in full sun.  If you are in a shady spot, you don't want dark photos because everything is contrasted so drastically...so look for natural reflectors, with your back to the sun or under a tree...find light colored sidewalks or a pond or even a building with light colored siding...use what is around you to naturally give you the light you need.

5. WATCH FOR HOT SPOTS, RACOON EYES AND HALF/HALF SHADOWS: I mentioned this a little bit before in my #2...be aware of the light as it hits your subjects.  You won't be happy with the final result if everyone has "black eyes" or if one eye is shut on the sunshine side of the face...Be ever aware of the direction of the light, the angle at which it falls...

The easiest times of day to shoot are typically early morning and then just before sunset.  The sun isn't at full force, so squinting is rare, but the light is soft and yet bright enough to give you the glow that you love...HOWEVER, "moments" don't always revolve around OUR time schedule...so be watchful and prepared so that you can not just capture moments, but capture them in a way that is meaningful and tells a story!

Enjoy!!!


Teach It Tuesday...

It's a short one...more of a "reminder"...

Today is my birthday...woot woot!!!

So, in honor of that AND {Teach It Tuesday} I thought I'd give a few tips on how to photograph a birthday event!  Most of the tips have to do with composition, but there are some technical aspects to consider as well!!!

I take pictures of my girls' birthday parties all the time, and when I can't do it, I get my BFF to come over and capture the important parts for me...

I went back to one of my favorite "themed" birthday parties for one of my girls...it's been almost 3 years since then, but I think the images will help in illustrating my "tips"

Here we go!

1. DETAILS:  This is probably my favorite part...especially if you have a "themed" birthday party.  Just like setting the "scene" in a story that you read, "details" help tell the story of the party itself...it gives you the "feeling" and helps you imagine yourself or remember yourself back to that moment in time!

Technical things to remember: find your light source and be sure that it illuminates the objects appropriately.  Use your camera settings to give a feeling of depth and "something happening behind the scenes"


2. CATCH the ACTION:  Especially for children's birthdays, there are a lot of expressions being made, action going on...have your camera ready...be inconspicuous so that you can capture those unexpected moments...surprise them and quickly take the picture...zoom in close, and then use a wide angle to show the entire scene.

Technical things to remember: Indoors especially you'll have to watch your camera settings.  This might mean limiting where you stand due to your light sources OR it might mean upping your ISO.  Do not lower your shutterspeed so much that you get blur.  Remember to use the tips on getting SHARP images as well


3. Don't forget to get a unique picture of the BIRTHDAY girl or boy!  This is sometimes hard for me to remember, as I get caught up in the moment.  However, it's important to capture the essence of the one whom you are celebrating...Don't just get a snapshot standing straight and tall and saying CHEESE...Make it about THEM...get them to laugh or giggle...find a way to capture WHO they are in that one small shot.


4. THE CAKE!  The cake can be part of the details, but also part of the action...Who doesn't love a good "blow out the candles" shot???  

Technical things to remember:  You can take this shot many different ways...you can focus in on the cake and blur the person...you can focus on the person & blur the cake...you can stand in front of your light source to give a crisp/bright feel or (as I did below) you can stand on the other side and create a shadowed/cozy feel.

5. PICTURE PEOPLE! Get pictures of people...even the cheesy shots...because your kiddos will want to remember who was there and what they got them...it's okay to get those "typical" shots every once in awhile...


When it's all said and done, you'll have a fantastic memory for your son or daughter or niece or nephew or whomever...and then if you get REALLY creative...you can make them a little slideshow they can put on their iphones and watch whenever they want!!!


I promise I don't talk this fast in real life!  

Just a few thoughts to ponder when trying to decide between taking your "big girl/boy camera" or just your iphone!


CHATBOOKS are a great, inexpensive option for iphone pictures that you still want to use to "tell the story" or document an event!

SHUTTERFLY has inexpensive scrapbooks that you can create...they have come a long way with their layouts, etc.  They give you a LOT of control to create your own unique albums.

I've recently started a BOARD on pinterest for ideas & ways to showcase your images.

Here is a link to my SNAPSHOP classes as well!  If you haven't taken a class yet, please shoot me an email at ctphotomemories@gmail.com...I'd LOVE to schedule a class later this fall!

HERE is my #kidsfreeinnyc INSTAGRAM gallery from my trip to NYC with my hubby...pictures taken just on my iphone as opposed to my big girl camera!

HERE is a blog post I did on TIPS for taking pictures while on vacation.
Photographers can get pretty secretive when it comes to "LOCATION" spots for their photography sessions.  I can understand this because who really wants to go to a crowded location and have to "wait your turn" to use a bridge or what have you...Others just don't want to tell you because they want to offer exclusivity and I understand that too, because if you live in the city and you've found a "country" spot all to yourself, why would you want to spread the word??

Then there are those crazy photographers like me that will go out with her best friend, who also happens to be a photographer, and show her ALL her spots and giggle the entire time and perhaps even "strike a pose" in the middle of it along the way...

but, I digress...

So, what does one look for in a 'setting' when you are taking photos...

Obviously when you are talking about "real sessions" you have to think about proximity and how far you want to drive, or if you are dealing with little kiddos with short legs & how much walking, etc etc...you also have to determine time of day and weather...

However, for today's {Teach It Tuesday} post, I want to just cover some basic things to look for when even just photographing your own kiddos...off the cuff...

1. Look for LIGHT...look for SHADE...find the natural REFLECTORS

Be aware of the light all around you...make a point to check the time of day and where the sun is headed.  Think about backlighting, open spaces...watch for how the sun filters through the trees or how it reflects off of a pond or lighter surfaces.

2. Look for TEXTURES


Textures can be the ground, or the background...You are looking for something that contributes to the image you envision...not something that "distracts" from it...it can be colorful like flowers or mural...


3. FRAMING...natural & architectural elements

This means looking for lines and repetition in your setting...Sometimes it means using trees to make a "frame" around your subjects...sometimes it means showing depth by blurring the repeating "lines" or to show distance and movement...Think of putting your subjects in the "negative" spaces to "frame" them in...


4. COLOR...remember your white balance

When I mention "color" in this way, I am not meaning in the sense of a "mural" or flowers...I'm thinking more in terms of what color is being reflected around you...For example, when I go deep into a certain area park, everything starts to turn green...just naturally, because there are so many trees and when the sun filters through, my naked eye sees GREEN everywhere...and therefore, if I keep my white balance on Auto, more times than not, my photos will turn out green.  It doesn't mean you shouldn't "shoot" there, it just means to be away of the COLOR of the light in the setting that you choose, because it will be another element to keep in mind when working with your camera settings.  


All the example photos that I chose to share came from the same location (just with different families) I love this place because of the 4 Components that I mentioned...it offers a lot of variety and yet, it keeps things basic and easy to follow with my composition set ups...and yet, there is still more to explore and different angles from which to shoot...

As always, just keep practicing!!!
Getting sharp images can be frustrating sometimes...I get it...if it's not running kiddos or low light, then it's someone bumping you or sneezing in the middle of the madness!

If you've been at this long enough too, you know that it DOES take some practice too...it takes some "revamping" of your mindset and forcing yourself to do things in the moment that don't come naturally (UNTIL you've practiced awhile)

With that said, here are some practical tips that will perhaps get you on the right track!

1. You gotta have a GOOD lens (preferably a PRIME). I hate to tell ya, but, kit lenses and the regular zooms that came with your camera are just not made to be as tack sharp as other lenses.  At the same time, if you don't know HOW to use a prime lens, you'll still get blurry pictures...(this is where a Snapshop comes in handy to learn the basics of camera functions and how it pertains to lens usage)

2. Do NOT go below 1/250 on your shutterspeed.  I know, I know...it seems impossible when indoors...and I understand.  Indoors you could "maybe" go to 1/125, but make sure you are REALLY following the rest of these tips so that you have the best chance, especially with moving kiddos!

3. Lock your arms & elbows.  You could even lean against a wall.  You want to pull your body in as tight as you can when you are focusing in on a shot.  The less movement you make, the better chance of a tack sharp image.

4. Hold your breath.  I know this sounds crazy, but, in the beginning, I don't think we all realize just how much our bodies move.  Mine moves like crazy because I have this unbelievable amount of adrenaline and excitement going on when I'm taking pictures...I have to remember to calm my insides down, just for that second and HOLD IT...it's not long, but you'd be amazed what even just that millimeter of a breath can do.

5. Be gentle with the shutter release button.  All the locking elbows and holding your breath, aren't going to be enough if you are crankin' down that button hard...those sharp, rough movements cause camera shake.  So, when you are focused in on a subject, press that button gently to produce the image shot.

6. Use Back Button Focus.  This became such a game changer for me!  I was suddenly able to figure out how to get my daughters' kicking a soccer ball mid air and it looked AWESOME!  If you are a part of the Snapshop Community, be sure to check out the video tutorial I posted in our private Facebook group!

7. Toggle your focal point.  I love toggling...I like the word "toggle" too...isn't just silly coming off your lips?  I digress... This is something else we discuss in a Snapshop AND will go more in depth with in a Snapshop #2...Move your focal points so that you don't have to jerk your camera to focus on your subjects.

8. Make sure everything you want in focus is on the SAME PLANE.  Some will argue that it's better to just shoot with a higher aperture and NOT to shoot wide open.  For beginners, I would say this is true.  Start with your aperture higher than 3 before you venture into the realms of 1.8 and 2.2!  However, for those that have been working with your prime lens...it's IMPERATIVE that your subjects all are on the same plane! Pretend their noses are pressed up against the same piece of glass. Depth of field is also VERY important when shooting wide open as well.  (again, more to talk about in a Snapshop #2)


______________________________________________

Keep practicing, practicing, practicing...

And for my Snapshop Grads, I'd LOVE to see your SHARP images on our Facebook Page!!!

Lifestyle photography can be daunting for some...

First of all, it can be an investment...I know that currently, I'm one of the least expensive photographers in my area as you consider my style of photography, but it's still a hefty investment for some...and that can get some people feeling rather nervous...

It's not like a $7.99 print from Sears of your kiddos in an enclosed room where you're just hoping to get a good shot to throw into a frame for grandma...

There's the worry of whether the kids will behave, will the location be nice, will the weather cooperate, what if I don't like my makeup or my clothes, what if not everyone smiles at the camera...and the list of worries continues...

let's just stop right there...

We need to adjust some expectations and "definitions",  if you will...

Lifestyle Photography isn't about getting "perfect" shots...it's about getting REAL images...

I had a conversation with a family 2 nights ago when I asked them to PLAY with their little girls...I asked them, "do you ever play ring around the rosey?" It turns out that they do...a lot...

I guaranteed them that when the girls turned 16 they were NOT going to "play" that anymore...this is a MOMENT in time...every individual is UNIQUE...every child has a PHASE (and it feels like it's a different phase every 3 days) But the point is that when you begin to see this type of photography for what it is (and what it is not) it helps to be able to appreciate the uniqueness of each session....

Now, I also know that no matter how many definitions or "adjusted expectations" I put out there..."MOM fears" are just THERE...

So, let me try to give some practical tips that you can apply on top of learning to "SEE" in a new way...

1. Choose clothing carefully | I've recently started working on my pinterest boards in order to help families have ideas for not only what to wear but what to expect...Please feel free to follow me there and check out the "What to Wear" boards...and also the "Families" board so that you get an idea of the types of moments that I'm looking for, as a photographer.

2. Make sure that everyone is well rested and well fed | If you need to bring snacks, do it...it doesn't do anyone good and relationships don't magically appear when kiddos are tired and husbands are starving! Once my fall schedule is actually verified for my own daughters' sports & activities, a first come, first serve posting will go out...you'll have at least 2 weeks to be able to plan and be ready for an upcoming session.

3. Leave time to get ready | I'm the WORST at time management...I just am...I'm a spontaneous, fly by the seat of my pants gal...and my husband knows it...and yet my entire family is NOT like that...so, for times when I get my own family photo session, I've learned to allow time for everyone to get ready...to allow my teenage daughters to feel pretty and make time to do their hair the way they feel best.

4. Ask everyone to be CHEERFUL participants | Listen, I GET it... I get the "faces" from everyone when I whip out my camera for yet MORE pictures!  However, I also know how much these pictures will mean to everyone later...maybe not today or tomorrow, but definitely 5 years from now...and years and years from now when my girlies are looking through scrapbooks...those moments captured will mean the world to them...so for the NOW, if I need to bribe them, if I need to make some loving promises to my spouse...so be it!

this is me and my brother...him doing a wonderful impression of how he feels about me asking for yet ANOTHER picture!!

But see...he cheers up 5 seconds later...because he, like me, KNOWS that images like this will be cherished for years to come! 


((and for MY part, as the photographer...I promise to be CHEERFUL and to make it a FUN experience for everyone...to the best of my ability))

5. Be natural |  This is hard...it's hard because we are nervous that it "won't look right" and it's an "investment" and all those worries I mentioned above come back to haunt you...Bear with me here though...Pinterest has made it nearly impossible to be "natural" with every pose known to man pinned to boards...but, the purpose of my light posing is just to "get the ball rolling"...so just go with it...because  #6

6. Not everyone has to be looking & smiling (leave that for the studio) | I know in a perfect world perhaps we'd all like christmas cards like the kardashians...(or maybe not...but, anyway) My girls have not always liked the camera...there were many years where their smiles were awkward and their eyes squinty...years where my youngest thought something scary was going to shoot her through the lens and refused to look at the camera at all...but ya know what...THAT'S OKAY IN MY BOOK!  Because refer to previously in this post:
Lifestyle Photography isn't about getting "perfect" shots...it's about getting REAL images...

7. Have AUTHENTIC FUN with your family...don't force it | I've had families bring soccer balls because that's their THING...If you've got a thing, then let's capture that...but, don't force throwing a toddler into the air or putting them on your shoulders when they are scared and it takes them out of their comfort zone...even if pinterest swears by it!  This is YOUR family...it's capturing YOU and the personalities of YOUR kids...Let your session be exclusive and incomparable...

Every person is uniquely made, unmatched and extraordinary!!!  Let those differences shine! Get out of the "cheese" mindset and love the LIFE you are creating with your family!!

I'm beyond thrilled that I get to watch and even be in a tiny part of the story that is unfolding!
Every photographer sees "life through the lens" in a different and unique way.

And each family is different and unique in THEIR own way...

As much as I hone my own eye and style for photography, I am constantly challenging myself to MEET families WHERE they are...to discover WHO they are...

I'm not one to attempt to make a family "conform" to a style that isn't their own...nor would I want all my sessions to look the same...

It's probably why I'm one of those "crazy photogs" that will shoot in morning light AND evening light...I'm one that welcomes an opportunity to shoot lifestyle and not so much studio or glamour shots...

because in reality...at least in my "telling of their story"...my job is to pull out the characters in a way that showcases THEM...

yes, I must use the light, and clothing that looks nice and hair styled...all those things together make for an "outward beauty"...but, for me, the REAL beauty is when I can pull the INside...OUT!

And THAT is when I know I've done my job...regardless of whether we had golden hour light or morning sunshine...beautiful clothing or whatever we happened to get our kids wrangled into...

For today's {Teach It Tuesday} I want to talk about "Time of Day" as it pertains to photos...either in my own CT PhotoMemories sessions OR with your own family!

Let me assure you...there IS a difference...HOWEVER, how much of a difference and what you do to compensate for little challenges is completely up to you!

Let me begin by saying this...you CAN photograph at ANY time of day...it would be silly to try to take pictures of your kiddos in a pool (because you wanted to capture their playfulness and part of that "story" for a vacation or what have you) at 6:30 in the morning or 8:30 at night...neither of those are conducive to non-crankie kids due to cold water, sleepiness, or "I'm hungry" (I understand that there are some exceptions to this, but just bear with me)

My point is this...as a MOM (or DAD), who KNOWS her/his camera, you ARE able to take photographs in any type of lighting situation...you CAN capture the moments regardless of whether you have perfect "lighting" or not...and if you don't, you truly need to attend a Snapshop Workshop with yours truly!!!

Now, that said, let's talk about a more "staged" or "scheduled" photo session...What is the big difference in the "time of day" in which you shoot?

MORNING:
Morning light is a term I use rather loosely...REAL morning light is when the sun is first coming up...when it's just peeking over the horizon...everything has a shimmer of the dew still on the green.  The sun is strong and bright and the rays bring a white light to the surroundings...

In terms of my own photography with clients, our "morning" is well before the noon hour and while we can still filter the light through the trees to avoid squinting.  However, the color of the light is brighter and more white/yellow than it is later in the day.  It gives me a feeling of bright, happy, breezy, curiosity and happy! Early morning light would be even easier to shoot in, which is why, as we head into fall, morning shoots are some of my faves due to the coolness of the morning and the light just peeking over the horizon...


LATE AFTERNOON/EVENING:
This is another time of day that seems to work well with families for the types of sessions that I offer...it's well before crankies set in for bedtime, but the sun is low enough in the sky that it's starting to lose it's yellow and have more of an orangey glow.  This is also the time of day where shadows dance and the sun can be almost on your face but it's so low in the sky that it works more as a reflector instead of needing to squint due to the brightness.


GOLDEN HOUR:
This is a "magical" time of day, and it goes rather quickly...it's the last moments before the sun is completely gone. It can also be explained like this: the times the angle between the sun and the earth’s surface is small which allows for the sunlight to flow over the landscape in a way that intensifies the colours of nature and also creates spectacular shadows
For example, sunset on August 4th is set for 8:45, according to the latitude/longitude times, golden hour will begin at 8:07  For me, images captured at these times produce a unique, moody, emotional depth in pictures...


There may be certain circumstances that constitute a specific time of day...but, more often than not, I just want to understand how the light is moving, coming up or setting...the color and amount of filters/shaded areas I have to work with...my goal is to produce a personal STORY using whatever elements I have on hand at the moment the story is taking place...

Some other resources about Lighting:

Understanding Hours & Light
Golden Hour Calculator