If you are like me...the only TRUE and REAL reason you ultimately own a "big girl/boy" camera is because you want to take amazing pictures of your own kids!

You didn't invest money in that camera body or fancy lenses so that you could just look cool while you were on vacation...you aren't necessarily passionate about taking pictures of bumblebees on flowers...I would venture to say that you are aiming your focal points towards the plates of food you eat every day...

NOPE...you aren't in this "photography thing" for any of that...

You want to document the lives of your kids...of your families...in an AWEsome way!

If you are like me, you want scrapbooks filled with pictures that your kids swoon over and want to look through over and over again...you want your facebook albums and instagram feeds to look like a magazine shoot so that you can just stare at your family and count your blessings over and over again!

We LOVE our families...and if we're honest, we DO like PRETTY things...we want our pictures to look PRETTY...to be AWESOME!

The first step on your way to reaching that goal, is learning your camera/equipment! If you follow this blog, it means you've probably already attended a Snapshop and have learned those foundational concepts...it's not just about snapping the shutter button at the right time...it's about exposure, metering correctly, focal points, aperture/shutterspeed/ISO and determining how you will use the settings together to create the image you envision...

These, and a whole lot more, are all things we cover in a Snapshop #1 or Basic Mentoring class.
We also spend a considerable amount of time on composition and photo recipes (Snapshop Grads, check out your booklet for examples)

For the purpose of this post, I'd like to elaborate just a tad more on some tips for photographing your own kids .

1. THINK COMPOSITION | Have your kids interact with one another...tickle, tell a joke, push on the swing, pull the wagon, play cards, throw a snowball...whatever you do, make it fun...don't make them hold hands if that isn't their thing...that's the quickest way to make that photo go downhill...remember we're documenting LIFE...make it REAL and FUN for them!

Get them engaged in their environment.  You've seen this picture before...it's about capturing a moment in their surrounding...you can't even SEE her face...because that's not what this picture's story is about...don't stop them from the action in which they are involved...and help them be active in the space instead of perhaps just sitting and having them stare at the camera lens.

Alter your perspective. Change your vantage point. Get out of your comfort zone, try to "see" in a different way.

Get on their level. You hear this all the time, but it's true, not just for the image itself, but for you as mom or dad...SEE what they see...I guarantee that their view is a LOT different than yours...and it might just change how you ask them to interact in that moment.

2. ANTICIPATE THEIR NEXT MOVE. This can be difficult, especially for beginners...but before you get out there and start clicking away, take a moment to take inventory...be aware of your surroundings and try to determine what your kids are going to do...are they just sitting there examining a lady bug...then you know what your settings can be without getting blur...Are they going to start jumping and running?  if so, be prepared with what you know about shutterspeed and your light source.  Have your camera ready before the moment takes place if you are able.

3. DON'T FEEL ENTITLED TO A GOOD SHOT | RELAX   This is a hard one and one that I struggle with...I feel that when I take the time to 'set up' a shot, doggone it those kids should cooperate and I should get a perfect image!!!  (insert stomping of feet) Does anyone else ever feel this way?  yes, well...it's gotta stop...we aren't entitled to anything just because we happen to SEE something in our minds eye...and I've had to let that go thousands of times...because that is yet another way to ruin photography for my kids when I make the experience all about the IMAGE instead of the MOMENT!

4. SHOOT MANY FRAMES IN A MOMENT  We now live in the digital age...so, by all means USE IT...you don't have to pay for rolls and rolls of film anymore...you can snap away...so do it....keep that trigger finger happy...you are bound to get something in there as you are first learning how to utilize all your settings in manual AND keep all those other things in a line as well.
Plus, you end up getting some pretty sweet timelines...

5. FOCUS ON THEIR EYES If you want a good focal point, go for the eye...toggle to that eyeball, pull those elbows in, steady yourself against the table or a tree...go for the shot!!

6. PHOTOGRAPH YOUR OWN KIDS OFTEN | LIKE A LOT, A LOT
I know many of you are rolling your eyes at this...the thing is, the more your kids are comfortable with you, with a camera in your hands, the more they will begin to just ignore that fact and continue in their moments...which is EXACTLY what you want them to do.  People ask me all the time if I have my kids trained...well, in a sense I do...they really just don't care that my camera is with me...it's ALWAYS with me...they are now to the age where THEY ask to carry it and take pictures...it's just part of our life.

7. PLAN A MINI SESSION  | UNDER 10 MINUTES
We've talked about being IN the moment, but I understand that you want SOME pictures of them looking at you...of their darling expressions...So, start planning...be prepared...Set up an area near a good light source ...then just ask your kiddo to come and have a seat in that spot...(you'll already know your settings because you'll have tested it with a stuffed animal or something) All you need to do now is engage them...get them talking about their favorite things, tell a joke, make a funny face, sing a song...All the while you are snapping away...do NOT make them stay longer than 5-7 minutes...just see what happens...it's great practice...and I think you'll be surprised...

Here's one I did back in 2012 with my youngest...
8. LISTEN TO THEM | Something I've learned (which HAS been a learning curve being the talkative person that I am) is that sometimes it's just better to listen...I have my own ideas, I KNOW what I want in a picture...but, that means NOTHING if I haven't connected with my girls...Sometimes it means letting THEM set something up and just going with it...LISTENING to their ideas and incorporating that into what I "see" as well.

In the last post we discussed when we might use an AUTO setting...

To sum up, AUTO can be used for many things, not just the "green" setting on the dial...there is auto FOCUS, auto WHITE BALANCE, auto FLASH...

When discussing different "settings" on your camera, try to determine towards what aspect you are referring...is it an "exposure" situation, is it a "color" situation, is it a "focusing" issue?  This will help direct you to the correct section in your camera's manual as you try to determine where a specific issue may lie.

Let's review a little about AUTO as it pertains to getting the correct EXPOSURE.

When you are in the AUTO setting on your camera's dial, you are allowing your camera to make all the decisions about an image. 

This mostly has to do with the exposure triangle (do we all remember that your camera is only a light sensor?  it doesn't have eyes, it does not SEE what you see...it just sends out it's "tractor beams" to measure the light where you have pointed the lens)

You should all have this cheat sheet somewhere :) 


AUTO mode | this means that the camera decides all the settings in order to get a properly exposed picture.  So, you may ask, why is this a problem?  Well, depending on what metering setting you have chosen, depending on where the auto has determined the focal point, depending on whether you have a still or moving subject...it could be a recipe for disaster in a picture....
your camera doesn't know if your subject is moving...
your camera doesn't know that you want  the dark brown teddy bear, sitting on the beach...
your camera doesn't know that just because there is a person in front of your daughter, you don't want THEM in focus, you want your DAUGHTER in focus

Once you've invested in a "big girl/boy" camera...your goal should be to get off auto as quickly as you can...you've spent too much to just let the camera decide the important moments of your life. Only use this in emergency situations where you MUST get a shot and you are completely at a loss and figure that you can "fix" it in photoshop later.

AV/A mode | In this mode, you get to choose the aperture...and then your camera determines what it needs to do with the other settings (shutterspeed & ISO) to make sure your image is correctly exposed. This is a great mode to practice in! Especially with a prime lens.

As I mentioned before, in the earlier post, this is great when there is adequate light.  When it doesn't work so well, is when you have moving subjects in an environment of LOW LIGHT...your camera can't SEE remember?  So if you are relying on the camera to make the decision on how fast the shutterspeed will click, when you don't have the light you need, and you've got moving subjects...you will get a blurry picture.

TV/S mode | I do not use this mode at all...there is no reason for me, especially when I have a prime lens.  Perhaps sports people like this indoors...but, if that's the case, you might as well go to Manual anyway!

Manual mode | This is when you use that beautiful "exposure triangle" up above.  Memorize what those numbers mean and how it affects your exposure.  You choose your ISO, your aperture and your shutterspeed based on what YOU can SEE, what YOU want to be exposed, and what YOU want in focus.

If you haven't taken a Snapshop Class yet, be sure to take one soon...you won't be sorry!  It's a worthwhile investment to take control of your camera and learn how to document the life of your family!  If you HAVE taken a class before, take a refresher on a Snapshop class when it's offered (it's only an additional $45 to sit in another class, hang out, eat, get the updated notes & added pages to your booklet) Or even consider a mentoring session...

It can be overwhelming at first...but I know, from experience, that once the information is broken down, into manageable segments...it's easier to understand...and in turn, easier to practice...which leads to confidence and ultimately capturing the important moments of your life! 


In my Snapshop Class, we talk about all the different shooting MODES...


Ultimately, our end goal, is to eventually feel comfortable in MANUAL mode...

But, let's be honest, it can be intimidating with all those buttons and the action happening so fast!

So let's talk about WHEN we "MIGHT" use another mode, other than MANUAL! or perhaps when
AUTO IS OKAY!! (Did I just say that???)

1. It's more important to GET THE SHOT than anything else..remember when I said that?
Practice Manual mode when you have the opportunity to practice...when something major important is going on and you don't want to miss the moment, that's NOT the time to fiddle with manual mode...as you get better and better during your PRACTICE time, when those special moments arise, you'll be more confident to spin it to M.

            *AV or A MODE; this is also a good "practice" mode to use because you only have to think about your aperture...nothing else...the camera calls the rest of the shots.  This is especially useful with a prime lens because you can have a wider aperture, ensuring the bokeh/blur, but not having to worry about the other settings. Being outdoors with LOTS of available light is also a good time to practice AV or A mode before going into Manual as well...because with lots of a light, and only allowing the camera to choose shutterspeed (not aperture) the camera will make sure to speed it up so that you not only get your blur from your chosen aperture setting, but you capture the action too.

             *if you are indoors, low light, and a moment is unfolding and you don't feel comfortable yet with what you've accomplished in your PRACTICE time...please don't feel badly using AUTO...yes, that silly pop up flash will pop up...but, so be it...AT LEAST YOU GOT THE MOMENT!!!

2. AUTO WHITE BALANCE
photo credits: kristen duke photography

There is no shame in AUTO WHITE BALANCE...It has been my experience that Nikon is sometimes more blue/green and Canon is more yellow when it comes to their interpretation of the color of light...but more times than not, Canon actually does a great job with white balance...and even if Nikon hasn't quite figured that out just yet (only in my opinion) I mainly keep it on AUTO...it's an easy fix post processing and I don't want to have it on shade, only to move into the sunlight and not have time to change it back. It depends on how long you are in your area of "colored light".  You can play around with it for sure...but, do not fear AUTO in this case.

3. AUTO FOCUS
I think this gets confusing for people sometimes.  Often people confuse auto focus with auto settings...it's not the same thing!  Auto focus means that the motor inside the camera is buzzing around when you push the shutter button down half way (or use back button focus) Auto settings means you are allowing the camera to determine the exposure settings BEFORE you take the picture.  Therefore, being on AUTO FOCUS is a GOOD thing...and pretty much all photographers (outside of nature photogs or macros lens users) stay on AUTO FOCUS.  You just have to make sure that the switch on your lens is moved to the AF setting.  That's it :) 

Hope that's been helpful a bit...perhaps clears some things up...maybe encourages you to practice, but focus more on the MOMENTS unfolding than anything else!  


I don't live on the beach...
I didn't grow up GOING to the beach...
My experience ON a beach is somewhat limited...

HOWEVER...

I know my camera, I'm always learning and watching the light, and doggone, I WANTED good beach vacation pictures...not just the normal blown out versions of my vaca or the super dark craziness that used to be the norm!!!

Many of you will be heading to the beach this summer...and I know even the thought of taking your beloved camera into the treacherous SANDY SHORE is enough to start you hyperventilating and thinking of creating a lock box for your precious babe...

I've been there...and even though I DID wrap my sweet Missy (that's my camera BTW) with 2 protective layers of towels, AFTER she was already nestled inside the camera back, which was inside the travel backpack in order to make our trek...I DID venture into the realm of some beach photography...

In years past, our family has gone to Florida and St. Joseph, up in Michigan as part of our summer getaways...

First and foremost, it's a good thing to understand the basic settings of your camera...how aperture, shutterspeed and ISO work together...especially on bright, sunshiny days...hopefully you are beginning to get a good handle on those concepts if you've attended a Snapshop...

I wanted to give you a few more helpful hints or suggestions that might take your beach photos just a tad farther this year...and that's what it's all about right?  just taking those baby steps to continue to grow and learn and document the life of your family...in your own unique way...

here we go:

1. Find a Nook:
You can look beyond the beach...it doesn't always have to be everything with pail and shovel...Find a little cove, a lighthouse, a grassy knoll...preferably a place that offers a bit of shade for those squinting eyes...but, still lets you document your time spent on the sandy shore.


remember to watch your light...reposition your little ones if you need to, to get the sun spots off their faces and let their sweet cheeks shine through...I think my niece is adorable, don't you???

2. Use a Wide Angle:
I'm notorious for getting in close...I love close ups...I just do...but so often, I will miss part of the "story" if I don't allow myself to back up and see the WHOLE picture...Don't forget to use a wide angle every once in awhile...Now, don't let it be cluttered with unimportant details, but try to think of a movie setting, as it pans while the opening credits are rolling...


3. Go in Close:
This is my thing!!!  I love to go in close, look for the special details...If you've been to a Snapshop you've seen the up close shells on the beach or the potato from the garden...These are the fun shots because you can have more control over the light because your body produces the shadow for you, if you put your body between your subject and the sun...


4. Use Reflections and Shadows:
The water and the sand can be helpful to you...use it to be creative...to see footprints or reflections...use the sun to make your fun shadows...

I know this is a crazy example...and not something that is necessarily "frame worthy"...but it's the idea that you can use the light in creative and fun ways...find the reflection in the water in the early morning, let the kids make shadows as the sun starts coming down...

5. Black and White ROCKS!!!
I think sometimes we think because we are on the ocean, or the lake, or the sun is shining brightly, that we need to rely on FULL color...that's not always the case...

look for texture or movement in your pictures so that the B/W will surface the emotion immediately...

sometimes black and white makes it all the more beautiful and tells the "story" in a different way...

6. Go for the Silhouette
You can go for the full blown silhouette by metering to the sky (the brightest part) so that your camera tells you that you have too much light and you need to close up that shutterspeed...it will darken everything else around and get you that silhouette look...

OR you can just go for a partial silhouette...where you get some colors too...


7. Be Creative:
You know that I'm all about not stopping the action...to catch the moments and relationships...BUT...sometimes part of the action, is getting your family in on a fun, creative way to document your trip...something out of the ordinary...

remember to just make it fun!!!


I've had a few of you ask what is in my camera bag and how do I utilize the lenses that I own.

My purchases have been slow and methodical...and not without some mistakes along the way.
However, I've come to love a select few "tools" that I wouldn't want to live without and I'm happy to share my thoughts with you!

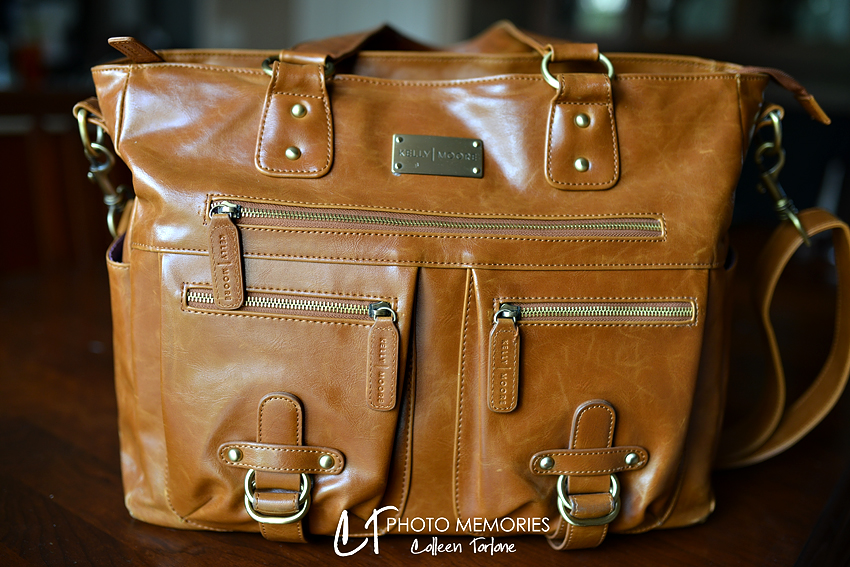
First off is my camera bag!

It's a Kelly Moore and I LOVE IT! 
Every photographer needs a bag...it's just a must...and this is my "must-have" bag!

I started off with a backpack, which was comfortable and held all my equipment.  However, I had to take it off in order to switch lenses. In a middle of a session, that is really cumbersome to do because you have "stop the action" in order to fiddle with the bag.  

Then I decided that I'd just sew my own bag...which I did (because I'm nuts!)  It worked great for awhile, but it just wasn't sturdy enough and eventually broke down after a few months.  

I was on the search for something durable, something my husband wouldn't feel silly carrying every once in awhile and something that would be efficient to use.

That's when I discovered the Kelly Moore bag...


It holds all the lenses that I could possibly need in a session, along with my wallet, glasses, a water bottle, phone, keys, business cards...there is even a place for a tablet or laptop (that I sometimes just put in the reflector if I think I'll need it)


This leads me to my GEAR!

I have a lot of lenses...not exhaustive, mind you...but, I find that there is a specific use for each of them as it pertains to my style and the "job" that I have created.

First off is the SIGMA ART 50/1.4

In the past I have always purchased Nikon...however, Sigma came out with an ART series that just blows Canon & Nikon out of the water with regards to speed and clarity.  This lens is the one on my camera probably 75% of the time during sessions or at home with my kids. With my full frame camera, I am able to get most of the shots that I want with this lens.  It is versatile and has beautiful bokeh.

USED FOR: family shots, close ups, basically EVERYTHING!


Next on the list is the SIGMA ART 35/1.4

This is typically the next lens I pick up during a family session.  It affords me the ability to get a wide angle view to include the setting.  It is also a GREAT help when I'm in a tight spot or when I'm standing overtop of little ones (being 5'4", I can only be so far from someone on my tiptoes).  My only caution with this one is to be careful when you are super close to a subject as it can cause distortion.

USED FOR: Getting in tight spots with little room, large family shots, including setting or landscapes


NIKON 85/1.4

This one is my baby!  It has a special place in my heart because it produces the most beautiful bokeh in the world!  I love it!  I use it pretty exclusively for portraits. There is something about the 85mm...although the before mentioned lenses all have the same f-stop capabilities, the compression in the 85 just makes for buttery backgrounds that are to die for!

USED FOR: portraits or whenever I want that really creamy background (I just have to watch my depth of field with regards to focus)


NIKON 70-200/2.8
This lens is big and bulky and SUPER HEAVY!  However, I couldn't do without it!  It use this mostly with my own family...soccer games, or when I just want to sneak up on my kiddos without them knowing that I'm getting them in the action.  I use this also for event photography, when I don't have a lot of options of moving in close.  The large focal range is amazing and the bokeh and sharpness is wonderful.  I will use back button focus on this especially during action shots and I'm always pleased with the results!


NIKON 24-70/2.8

This was the first "BIG" lens that I ever purchased.  It has a wide angle and it zooms fairly close at 70.  It can be used in lower light situations and it was my workhorse lens for a longggg time before I became a "prime lens girl".  This is the lens that I will use to teach my daughters.  I don't really carry this one in my bag any longer, as I love to utilize all the different possibilities that the primes offer me. However, it was a great lens starting off and learning the focal ranges at which I typically shot.


NIKON SB600 

This flash is old, old, old, but I love it.  It does just what I need it to do and has never let me down.  I only use it directly when I used to shoot weddings.  Now, I use it to bounce light when doing event photography or when I'm indoors in the winter and have little light available to me.  I couldn't live without an external flash, as it helps me bring the "natural" back into an image, when I don't have the "natural" light that I need. 


I wanted to touch base with all my Snapshop Grads and do just a little review about metering...

I think that metering sometimes gets overwhelming because you must be thinking about not just measuring the light, but then trying to determine HOW you're going to get enough or get rid of, that light by using your aperture, shutterspeed and/or ISO.

Let's review just a bit...back to some foundational
things...

First of all, remember that your camera is a LIGHT SENSOR...it doesn't "see" pictures, people, trees, dogs, landscapes, etc...it doesn't "SEE" anything...it just measures the light...

it measures the highlights, the shadows...it measures in what we call a "histogram" (Snapshop #2 will go into that a little bit more)

When you are telling your camera to measure light, you have to tell it WHERE you want to measure it...

Matrix metering mode (for Nikon), or evaluative metering (for Canon) considers the largest portion of the scene when metering the light.

The camera’s sensor considers all available light in any given situation and comes up with the best suggested exposure. When you don't have too many contrasting images, and you have nice even light, this works well...especially when you want to capture an entire landscape or the "setting" is really important in your image as well.

Center-weighted or Partial mode is a little bit like matrix metering.  In this case though, is sort of disregards the WHOLE picture and "senses" in on the middle or the center of the frame.  It measures the light in a little area around the middle and "reports back" to you what kind of light you have so that that area is exposed correctly (it may mean the the outside edges will be too light or too dark depending on what you are shooting).

Spot Metering is exactly that...your camera sends out it's "tractor beams" of light to that specific spot in the frame and just ignores everything else!  This type of metering tends to give you the most control when you are taking photographs of specific people and want THEM exposed correctly.  However, be mindful that if you are spot metering on a face and the person is wearing a contrasting color, the shirt or dress may be blown out or a dark blob...in these cases, you'll need to practice upon which area of the image you want to meter the light. (see below)

Here we have a beautiful little Princess Palace Pet to help us demonstrate the "light measuring"...

I put her on the window sill so that we would have that contrast of light on one side and dark on the other...(just because I like a challenge) I metered out to "0" just to be fair and put it in the "exact" exposure according to my camera. I kept my aperture at 2. 2 for all of them and ISO at 200..I just adjusted my shutterspeed for this tutorial.

With the Matrix metering, the camera took into consideration EVERYTHING...therefore it came up with an "average" and told me that I needed to adjust my settings accordingly...it metered out when I hit 1/2000 of a second with my shutterspeed. Notice that little Beauty looks a little underexposed.  She's darker on one side than the other and sort of fades into the dark on the right side of the image.


Center weighted got a little bit better.  I measured the light on Beauty's face...by doing this, my camera is measuring the light there, but also in a partial circle around beauty...so notice that it recognized that I needed more light in order to brighten up Beauty's right side of the face, along with her tail.  However, the window gets a lot brighter as well, because the camera is ignoring that portion of the LCD screen.


Spot metering gets Beauty perfectly.  I tried to meter on the left eye towards the middle of her head.  If I would have metered on her tail or the right eye, the camera would have measured not enough light and in my changing of settings, the left side of her face would have been blown out. Therefore, with spot metering it takes some practice to determine where to tell the camera to measure the light.

Notice with spot that EVERYTHING got brighter because the camera was ONLY CONSIDERING the light ON THE SPOT on Beauty's face...nowhere else...In this case, I metered out at 1/800 of a second...more than half of what matrix metering told me to do.

While this works well in this situation, I have to be careful when spot metering in high contrasting situations...for example, in the snow, I can spot meter on my child's face in her dark gloves & scarf...however, when I meter out, the snow will have no detail whatsoever, because it will have blown out completely...again, it will depend on the "story" you want to tell, and what you deem most important in your photograph.


Hope that helps a little with regards to working in Manual mode and metering your available light.

Light can often be the difference between a good picture and a "not so good" picture (because remember, AT LEAST it's a picture that you have!!!)

Often we've metered the best that we are able...and we think the shutterspeed and aperture are such that we won't get blur, as long as the subject doesn't move...but the image just still looks blurry...this is generally due to not enough light.  

Light can sometimes be our biggest nemesis...especially when we don't have enough of it...

We are coming into the Spring season...where the daylight will stick around longer...however, in this part of the country, it often means rain and just the usual spring weather...which, in turn, keeps us inside...a lot!

I receive the most questions about LIGHT when people start talking photography with me.  If you remember in our Snapshops, we talked about light just a bit (there is even a little page in your booklet about it)  

We discussed just basic things like:
*if you put the light source BEHIND the person, depending on the time of day, faces could be completely shadowed...during a "golden hour" you might get more of a halo, gorgeous glow...regardless, it all depends on where that light is and how it is settling onto your subject.

*If a light source is to the side of a person, you might get those half and half shadows on their skin...but, again, this depends on the strength of the light and whether it is filtered through clouds or the time of day...

There is so much to consider when trying to capture just the right moment...
~You are trying to determine the part of the story that you want to showcase (character, setting, details...etc)
~You are choosing the best "frame" for the picture (principle of thirds, close up, angle up or down....etc)
~You are then asking your camera to measure the light on your subject while simultaneously determining how much bokeh you'd like, as it coincides with your shutterspeed (whether you've got a moving kiddo) all the while making sure you don't get too much grain with ISO...

WHEW!!!  That's a LOT to think about all at once!!!

AND THEN...before all this even takes place, you've got to determine your light source...
the color of the light (sun, lamp, window, reflecting off walls)
the angle of the light (straight overhead, filtered through clouds, setting in the sky)
the strength of the light (time of day, size of window or doorwall, lightbulb)

All these things factor in when you are determining where to take a picture...

Let's spend a little time with "indoor light" for the sake of this blog post :) 

Where are the best places in your home that give you the best light for a photo?
How can you set yourself up for SUCCESS when we're stuck inside this spring?

1. WINDOWS: near windows are sometimes the best places to get pictures in our homes...however, as I mentioned above, you still have to consider the strength and angle of the sun coming through at any particular time of day.  You wouldn't want to sit your child in the area of the most intense light on a bright, sunny day.  You'd want to find the area where the light becomes softer versus harsh.


2. SHEER CURTAINS: Have you ever seen softboxes in a studio?  Sheer curtains act like a soft box...they can be a great backdrop for a photo, especially on days when the sun is most harsh streaming through the windows.  

3. OPEN DOORS:  we practiced a bit in front of the open door in my home at the Ohio Snapshops. However, you need to follow the same guidelines as with windows with regards to strength and angle of light streaming in, otherwise, you get too harsh of light hitting faces and it looks similar to sitting outside at noon with squinty eyes.  Open doors are also great for silhouettes (if you wanted to practice increasing that shutterspeed to make your subject DARK, but allowing the light to be seen...if you want to completely blow OUT the light in the door, you would make your shutterspeed slower...however, the slower you go, the more light you allow on your subject and it isn't as much of a silhouette at that point.


4. LAMPS: using lamps as your light source can be tricky, especially with the color of the light...things have more of a yellow glow to them...I would use this for a dramatic look...like a candlelight service at Christmas...these are photos that you are focusing in on a detail or the subject's face...not so much the setting or action taking place...your ISO will need to be higher and your image will take on a warmer tone.


5. REFLECTIVE WALLS, COUNTERTOPS, TUBS: Anything that is white or light colored will reflect light...I get much better lighting in my music room which has light khaki walls and cream carpet as opposed to my kitchen with my bright red wall and cherry wood floor & furniture.  
(see images above for that "reflective" light as well...the walls were yellow...combined with the ceiling lights, the "color" was definitely warmer in these situations)


These are just examples of situations that I've had "low light" OR I've been stuck indoors and wanted to still capture a moment.  Once I know what I'm working with, I can figure out my storytelling options and work with the light & my camera settings to get the best image...